Technique: Resin Story Rings ~
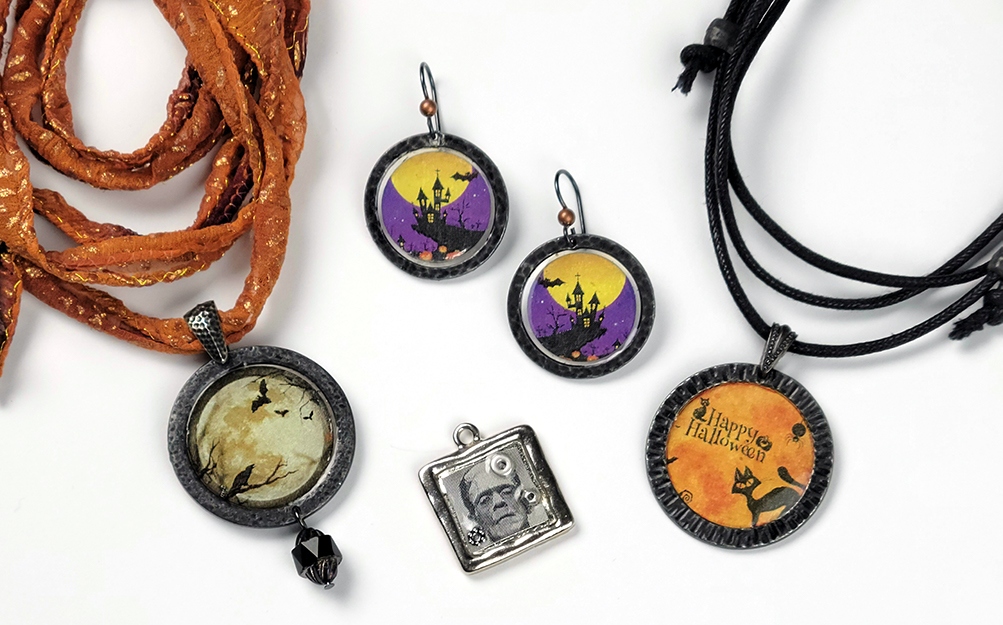
Did you know that you can use open ring components as mixed media frames? We recently did a Facebook Live video demoing our technique for creating “Story Rings” with TierraCast rings, UV resin, craft paper, and inclusions. This process results in truly personalized charms and pendants for unique jewelry and craft projects. Choose imagery to fit your theme. The possibilities are endless!
SUPPLIES NEEDED TO MAKE STORY RINGS:
- Ring Components (Click HERE to see our ring options)
- Images sized to fit ring
- Packing tape
- Brush on super glue
- Scissors
- Exacto or craft knife (optional)
- Sharo nose tweezers
- Pen or pencil
- Craft punches (optional)
- Scrapbooking paper (white on one side)
- Or good quality printer paper
- UV resin such as Magic-Glos
- UV lamp
- Cotton swabs
- Tweezers
- Tissues
- Credit card or small piece of card stock
- Metal hole punching tool 1.25mm
STEPS:
- Select images and place into a word doc allowing white space between images. Size to fit rings. Hint: set doc at 94% view (letter size) to help size images accurately.)
- Once images are printed use scissors to separate them with room around edges to hold onto. Place tape over front and back of images and rub down well. Hint: the edge of the credit card works well for this.
- Place ring over image and use a sharp pencil to trace around inside edge, then use craft knife or scissors to cut out shape, cutting a little bit outside of pencil line. Optional: use a round craft/paper punch to cut out image. See further instructions in Step 6b*.
- Brush a light coat of super glue around the edge of the images to seal them. (This prevents resin from soaking into the paper between the layers of tape.) Allow to dry.
- Use metal hole punching tool to make a hole in the edge of each ring. Position the tool carefully before punching, erring closer to the inside edge of the ring than the outside.
- Cut a piece of tape larger than the ring and adhere it to the back
side. Rub tape down as well as possible. Place ring and tape down, then
position image into center. Use a cotton swab to smooth down.
6b.*If a craft punch is used the image may be slightly larger than the ring opening. In this case skip the tape - instead use a pencil to make a small tick mark on the back of the image at the top (for aligning with hole in ring). Brush super glue directly onto the back of the ring, then use sharp nose tweezers to position image face down onto the glue. Use back of tweezers to press edges down onto ring. Allow to dry. Skip Step 7. - Brush super glue around inside edge of ring. Allow to dry.
- Apply uv resin to desired depth. Allow to self level for several minutes. Add additional resin if needed. (Don't be afraid to add more - a very nice dome can be achieved if desired!) Use sharp nose tweezers to scoop out any bubbles that appear. (Optional: hold a thread burner or lit match over bubbles to pop them.)
- Slide credit card underneath ring assembly and place into uv lamp. Allow to cure for 15-20 minutes.
- Once cured remove from lamp and carefully peel tape from back. If resin leaked under tape it can be peeled away if the resin is still slightly soft, or trimmed away with a craft knife if more cured. (Be careful not to scrape plating from ring.) If resin is still soft on the back side after removing tape place into lamp upside down for a few more minutes. It may be necessary to re-open the punched hole.
- Once story ring is completed attach a jump ring or pinch bail and add to your jewelry design.
HELPFUL TIPS:
- Image sources include your own personal images and subscription sites like iStock and Shutterstock, and open-source sites like Pixabay.com.
- If you are concerned about the white edge of your paper showing, try using a colored permanent marker to color around the edge after you've brushed the edge with super glue.
- Try punching two holes in your ring so that an element can be hung from the bottom.
- Use spacer beads or other small components as inclusions in your resin.
We hope you enjoy playing with this idea! We have certainly had fun with it over the years. Click the links below for our recent video, and also our original short YouTube tutorial from the archives!
WATCH OUR HALLOWEEN THEMED STORY RINGS VIDEO
NEED A SHORT VERSION? WATCH OUR ORIGINAL YOUTUBE STORY RINGS VIDEO
Try this addicting technique with the project below!