Design Inspiration Supplies


Design Instructions

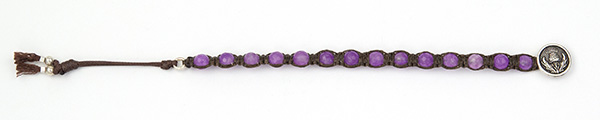
Supplies needed
-
1 Thistle Button (94-6607-12)
- 2 Crimp Bead 2x2mm ID (01-0030-11)
- 2 Crimp Cover 3mm (01-0032-11) or other 3-4mm accent bead
- 1 Round Ring, 6-8mm (try our 3/8" Hammertone Ring, Sm Coiled Ring, or Distressed Oval)
-
14 8mm Faceted Round Amethyst Gemstone Beads (or similar)
-
Waxed Braided Cord, size 12
- Faux Leather, 1mm
Tools
- scissors
- leadered needle
- Knotty Do-it-All knotting and design board
- lighter or thread burner
- crimping pliers
Skill Level: Beginner-Intermediate. Knowledge of various macramé knots is helpful.
Finished Size: Approx. 7”
Designer: Sandra Younger
Watch Sandra demo this bracelet: Macrame Techniques Jewelry Making Demo
Download the Sandra's Macramé Bracelet PDF
This project uses Square Knot Macramé. Watch our Colorful Macramé Bracelet tutorial on YouTube for the basics of this technique.
Tip: In square knot macramé 2 half knots equal 1 square macramé knot. For simplicity in these instructions each half knot is referred to as 1 knot. For visual aids and tips watch the Macrame Techniques Jewelry Making Demo.
Steps
- Bracelet: Cut 2 yards of waxed cord, fold in half and add a leadered needle at the fold.
- String on 14 gemstone beads, then cut off needle.
- Attach fold of cord to button shank with a Larks Head Knot, but do not tighten knot.
- Cut 1 1/2 yards of waxed cord and feed through Larks Head Knot. Center cord, then tighten knot. Attach button to a clip on the board. Attach the loose ends of the cord below the beads to another clip about 5-6" away.
- Tie 4 knots (2 full square knots)in the knotting cords, then slide 1 bead up and tie 1 knot around it.
- Repeat Step 5 until all beads are completed.
- After knotting final bead trim knotting cords to about 1/8" and use lighter or thread burner to melt ends. Unclip this end from board.
- Thread a small piece of scrap cord through small ring and attach to the clip to hold ring in place. Thread cords at end of bracelet through ring from bottom and use these cords to begin knotting back down the bracelet over the previous knots. At button shank, trim and burn ends as in Step 7.
- Button loop: Attach 1 pin and 1 clip 1" apart on board.
- Cut a 10" piece of 1mm faux leather and thread through ring at end of bracelet. Fold so 1 end is 4" longer, then attach to clip placed in Step 9.
- Pull cords to peg and hold against peg with fingers, then pick up a second peg and hold across the first peg and the cords. Wrap longer cord around peg 1, then under peg 2 and around cords twice. Holding knot in place, slide peg 2 out and thread wrapped cord end back through tunnel left by peg and loop around peg. Begin to tighten, lifting knot off of peg 1 to continue tightening, then slide knot down to ring.
- Remove peg from board and add a second clip 3" from the first.
- Attach ring to first clip and tails to second clip.
- Cut 5" of faux leather. Thread it under tails to center, then pick up 1 peg and hold it along tails. Wrap 5" piece of cord around tails and peg 3-4 times. Hold wrap in place and remove peg. Thread tails of wrapped cord through tunnel from each side and pull to tighten. Tie a knot or stick a pin in the tail facing end of the button loop. Slide knot close to tail ends. Trim marked tail to 1/8" and use lighter or thread burner to melt, making sure not to melt adjacent tails. Repeat with tail on other side of sliding knot. Slide this knot back down to previous knot.
- Repeat Step 14.
- Position sliding knots where desired for button loop.
- Tie an overhand knot in each tail on far side of second sliding knot. If using accent beads thread 1 onto each tail and position next to overhand knot, followed by 1 crimp bead. Use chain nose pliers to flatten crimp bead. If using crimp covers instead of accent beads string crimp beads first and flatten about 1/8" from overhand knots, then use crimping pliers to place crimp covers between knots and crimp beads. Trim tails to desired length and use pin to fluff.