Design Inspiration Supplies


Design Instructions

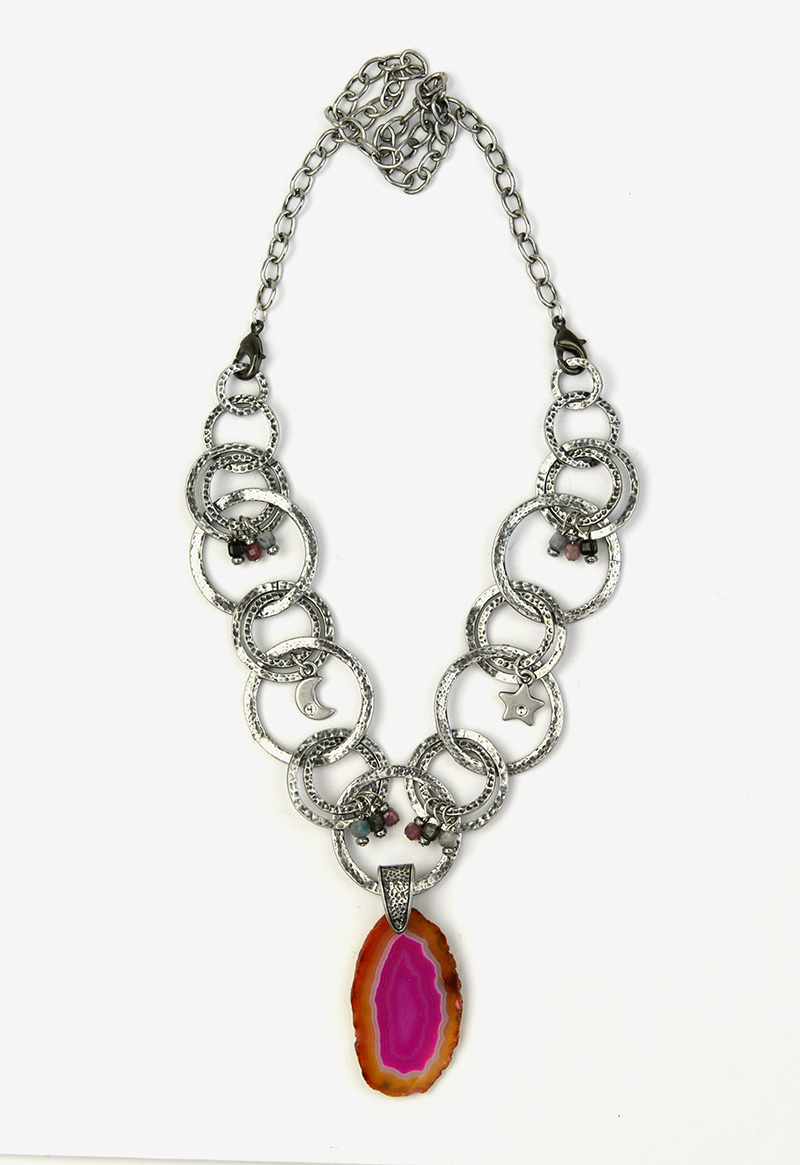
Supplies needed
- 2 Hammertone 1/2" Ring (94-3086-40)
- 6 Hammertone 3/4" Ring (94-3087-40)
- 6 Hammertone 1" Ring (94-3085-40)
- 5 Hammertone 1 1/4" Ring (94-3231-40)
- 1 Hammertone 15mm Pinch Bail (94-5857-40)
- 1 Moon Charm w/SS9 Crystal (94-6847-40)
- 1 Star Charm w/SS9 Crystal (94-6848-40)
- 12 Disk 3mm Spacer Bead (93-0439-40)
- 12 Head Pin 22ga 2" (01-0036-01)
- 4 Oval Jump Ring 4x3mm ID (01-0018-70)
- 2 Lobster Clasp 15x9mm (01-0111-13)
- 12" Brass Cable 8x5mm Chain (20-0625-12)
- 12 Multi-color Tourmaline Gemstone 4mm Faceted Cube Bead
- 1 Dyed Agate Gemstone Focal Slice 43x25mm
Tools
- flush cutters
- chain and/or flat nose pliers (2)
- round nose pliers
- half-round and flat nylon jaw forming pliers
- jeweler's saw
- 1/0-2/0 jeweler's saw blade
- Kierston's recommended supplies for basic metalsmithing include: bench pin, C-clamp (if bench pin doesn't have attached anvil), surface to clamp on (desk or workbench), saw frame and blades
Skill Level: Beginner-Intermediate (basic metalsmithing experience recommended)
Finished Size: Approx. 26"
Designer: Tracy Proctor
Download the Interlocked Rings Earrings PDF
Watch our technique videos TierraCast Blog (look for Simple Loops and Jump Rings).
Tip: Open and close the sawed rings as you would a jump ring: twist cut ends back and forth past each other a few times while pushing the ends slightly towards each other. With the final pass a slight click as they line up ensures a snug close! Trim chain as needed for desired necklace length.
Steps
- Use 1 jump ring to attach 1 lobster clasp to one end of chain. Repeat with jump ring and second lobster clasp at other end. Set aside.
- String 1 gemstone cube bead and 1 disk spacer onto 1 head pin. Bend wire over at top of bead and trim wire to 1/2-5/8", then use round nose pliers to form large simple loop. Repeat with remaining gemstone beads and head pins, alternating order of beads (gemstone then disk, or disk then gemstone) as desired. Set aside.
- Use forming pliers to create waves in all of the hammertone rings: squeeze pliers firmly onto one part of ring, then flip pliers over and squeeze again next to first curve. Repeat all the way around ring.
- Use saw to make one cut through all 3/4" rings and all 1" rings.
- Open lobster clasp at one end of chain and attach to one 1/2" ring.
- Open one 3/4" ring and attach to 1/2" ring. Close ring. (See Tip)
- Open one 3/4" ring and one 1" ring and attach both to previous 3/4" ring. Before closing attach one 1 1/4" ring. Close rings.
- Open one 3/4" ring and one 1" ring and attach both to 1 1/4" ring. Before closing attach second 1 1/4" ring. Close rings.
- Repeat Step 8 three times.
- Repeat Step 8 once more, finishing with a 3/4" ring in place of 1 1/4" ring. Before closing final 3/4" ring attach second 1/2" ring. Close ring.
- Attach second lobster clasp to 1/2" ring.
- Place pinch bail over center 1 1/4" ring. Attach gemstone focal slice and close pinch bail securely.
- On one side of necklace attach 3 gemstone dangles to the 3/4" ring attached to center ring.
- On next 3/4" ring use 1 jump ring to attach 1 charm.
- On next 3/4" ring attach 3 more gemstone dangles.
- Repeat Steps 13-15 on other side.